Androidのアプリ作成で、レイアウトのxmlコードでTextViewのタグの部分をScrollViewタグで挟むことによって、TextViewをスクロール出来るように出来ます。
但し、画面全体をさらにScrollViewタグで挟んで画面全体をスクロール出来るようにした場合に、TextView内のみをスクロールしょうとすると画面全体がスクロールしてしまいTextView内のスクロールが出来ません。その場合の対処方法に関して記します。
1.現象
Androidのアプリ作成で、レイアウトのxmlコードでTextViewタグを含む画面全体をScrollViewタグで挟んで全画面のスクロールをさせるようにした場合、TextViewタグの部分をScrollViewタグで挟んでもTextViewだけのスクロールが出来ない。(下記動画)
2.開発環境等
開発ツールバージョン: Android Studio Giraffe 2022.3.1 Path3
使用言語: Kotlin
3.対処方法
レイアウトのxmlコード(app→res→layout→activity_main.xml)のTextViewタグ部分を挟むScrollViewのタグをNestedScrollViewに変える。
4.対処方法の例
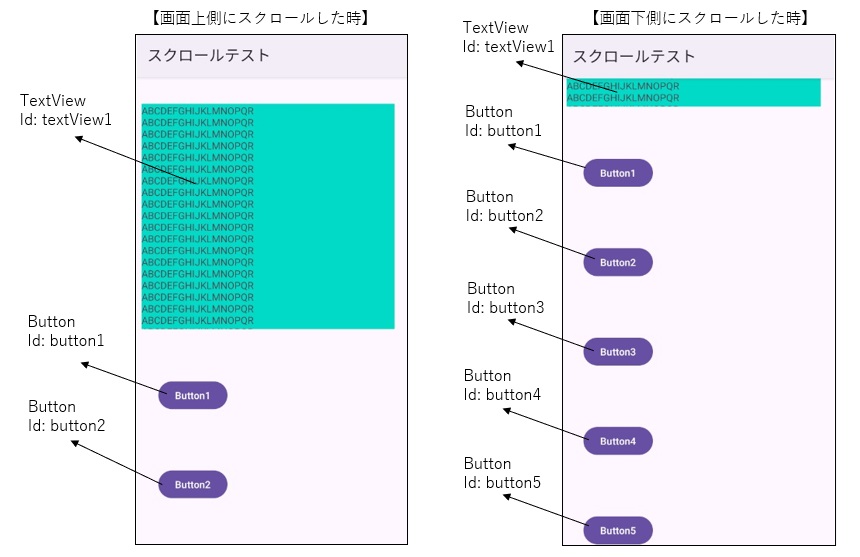
Designモードを使用して下記の様に部品を配置した場合の例を示します。(ConstraintLayout使用)
5.修正前のレイアウトのxmlコード
修正前のレイアウトのxmlコード(app→res→layout→activity_main.xml)を以下に示します。
2行目~7行目、85行目:
全画面をスクロールさせるためのScrollViewのタグ
14行目~23行目、32行目:
TextViewをスクロールさせるためのScrollViewのタグ。
このままの記述では、TextView単体のスクロールが出来なくなってしまいます。
<?xml version="1.0" encoding="utf-8"?>
<ScrollView xmlns:android="http://schemas.android.com/apk/res/android"
    xmlns:app="http://schemas.android.com/apk/res-auto"
    xmlns:tools="http://schemas.android.com/tools"
    android:layout_width="match_parent"
    android:layout_height="match_parent"
    android:fillViewport="true">

<androidx.constraintlayout.widget.ConstraintLayout
    android:layout_width="match_parent"
    android:layout_height="match_parent"
    tools:context=".MainActivity">

    <ScrollView
        android:id="@+id/ScrollView1"
        android:layout_width="363dp"
        android:layout_height="324dp"
        android:layout_marginStart="8dp"
        android:layout_marginTop="38dp"
        android:fillViewport="true"
        android:scrollbars="vertical"
        app:layout_constraintStart_toStartOf="parent"
        app:layout_constraintTop_toTopOf="parent" >

        <TextView
            android:id="@+id/textView1"
            android:layout_width="match_parent"
            android:layout_height="match_parent"
            android:background="@color/design_default_color_secondary"
            android:text="TextView1" />

    </ScrollView>

    <Button
        android:id="@+id/button1"
        android:layout_width="wrap_content"
        android:layout_height="wrap_content"
        android:layout_marginStart="32dp"
        android:layout_marginTop="71dp"
        android:text="Button1"
        app:layout_constraintStart_toStartOf="parent"
        app:layout_constraintTop_toBottomOf="@+id/ScrollView1" />

    <Button
        android:id="@+id/button2"
        android:layout_width="wrap_content"
        android:layout_height="wrap_content"
        android:layout_marginStart="32dp"
        android:layout_marginTop="80dp"
        android:text="Button2"
        app:layout_constraintStart_toStartOf="parent"
        app:layout_constraintTop_toBottomOf="@+id/button1" />

    <Button
        android:id="@+id/button3"
        android:layout_width="wrap_content"
        android:layout_height="wrap_content"
        android:layout_marginStart="32dp"
        android:layout_marginTop="80dp"
        android:text="Button3"
        app:layout_constraintStart_toStartOf="parent"
        app:layout_constraintTop_toBottomOf="@+id/button2" />

    <Button
        android:id="@+id/button4"
        android:layout_width="wrap_content"
        android:layout_height="wrap_content"
        android:layout_marginStart="32dp"
        android:layout_marginTop="80dp"
        android:text="Button4"
        app:layout_constraintStart_toStartOf="parent"
        app:layout_constraintTop_toBottomOf="@+id/button3" />

    <Button
        android:id="@+id/button5"
        android:layout_width="wrap_content"
        android:layout_height="wrap_content"
        android:layout_marginStart="32dp"
        android:layout_marginTop="80dp"
        android:text="Button5"
        app:layout_constraintStart_toStartOf="parent"
        app:layout_constraintTop_toBottomOf="@+id/button4" />

</androidx.constraintlayout.widget.ConstraintLayout>
</ScrollView> 6.MainActivity.ktのコード
TextViewにテキストを設定しているKotlinプログラム (MainActivity.kt)のコードを以下に示します。
class MainActivity : AppCompatActivity() {
    override fun onCreate(savedInstanceState: Bundle?) {
        super.onCreate(savedInstanceState)
        setContentView(R.layout.activity_main)

        val tView1 = findViewById<TextView>(R.id.textView1)
        tView1.movementMethod = ScrollingMovementMethod()

        val text1 = "ABCDEFGHIJKLMNOPQR\r\n" +
                "ABCDEFGHIJKLMNOPQR\r\n" +
                "ABCDEFGHIJKLMNOPQR\r\n" +
                "ABCDEFGHIJKLMNOPQR\r\n" +
                "ABCDEFGHIJKLMNOPQR\r\n" +
                "ABCDEFGHIJKLMNOPQR\r\n" +
                "ABCDEFGHIJKLMNOPQR\r\n" +
                "ABCDEFGHIJKLMNOPQR\r\n" +
                "ABCDEFGHIJKLMNOPQR\r\n" +
                "ABCDEFGHIJKLMNOPQR\r\n" +
                "ABCDEFGHIJKLMNOPQR\r\n" +
                "ABCDEFGHIJKLMNOPQR\r\n" +
                "ABCDEFGHIJKLMNOPQR\r\n" +
                "ABCDEFGHIJKLMNOPQR\r\n" +
                "ABCDEFGHIJKLMNOPQR\r\n" +
                "ABCDEFGHIJKLMNOPQR\r\n" +
                "ABCDEFGHIJKLMNOPQR\r\n" +
                "ABCDEFGHIJKLMNOPQR\r\n" +
                "ABCDEFGHIJKLMNOPQR\r\n" +
                "ABCDEFGHIJKLMNOPQR\r\n" +
                "ABCDEFGHIJKLMNOPQR\r\n" +
                "12345678901234567890123\r\n" +
                "12345678901234567890123\r\n" +
                "12345678901234567890123\r\n" +
                "12345678901234567890123\r\n" +
                "12345678901234567890123\r\n" +
                "12345678901234567890123\r\n" +
                "12345678901234567890123\r\n" +
                "12345678901234567890123\r\n" +
                "12345678901234567890123\r\n" +
                "12345678901234567890123\r\n" +
                "12345678901234567890123\r\n" +
                "12345678901234567890123\r\n" +
                "12345678901234567890123\r\n"

        tView1.text = text1
    }
}7.修正後のレイアウトのxmlコード
修正後のレイアウトのxmlコード(app→res→layout→activity_main.xml)を以下に示します。
ScrollViewのタグをandroidx.core.widget.NestedScrollViewに変えています。
14行目~23行目、32行目:
TextView内をスクロールさせるためのNestedScrollViewのタグです。
21行目の android:scrollbars=”vertical”
を入れることによってTextViewに縦方向のスクロールバーが表示されます。
<?xml version="1.0" encoding="utf-8"?>
<ScrollView xmlns:android="http://schemas.android.com/apk/res/android"
    xmlns:app="http://schemas.android.com/apk/res-auto"
    xmlns:tools="http://schemas.android.com/tools"
    android:layout_width="match_parent"
    android:layout_height="match_parent"
    android:fillViewport="true">

<androidx.constraintlayout.widget.ConstraintLayout
    android:layout_width="match_parent"
    android:layout_height="match_parent"
    tools:context=".MainActivity">

    <androidx.core.widget.NestedScrollView
        android:id="@+id/ScrollView1"
        android:layout_width="363dp"
        android:layout_height="324dp"
        android:layout_marginStart="8dp"
        android:layout_marginTop="38dp"
        android:fillViewport="true"
        android:scrollbars="vertical"
        app:layout_constraintStart_toStartOf="parent"
        app:layout_constraintTop_toTopOf="parent" >

        <TextView
            android:id="@+id/textView1"
            android:layout_width="match_parent"
            android:layout_height="match_parent"
            android:background="@color/design_default_color_secondary"
            android:text="TextView1" />

    </androidx.core.widget.NestedScrollView>

    <Button
        android:id="@+id/button1"
        android:layout_width="wrap_content"
        android:layout_height="wrap_content"
        android:layout_marginStart="32dp"
        android:layout_marginTop="71dp"
        android:text="Button1"
        app:layout_constraintStart_toStartOf="parent"
        app:layout_constraintTop_toBottomOf="@+id/ScrollView1" />

    <Button
        android:id="@+id/button2"
        android:layout_width="wrap_content"
        android:layout_height="wrap_content"
        android:layout_marginStart="32dp"
        android:layout_marginTop="80dp"
        android:text="Button2"
        app:layout_constraintStart_toStartOf="parent"
        app:layout_constraintTop_toBottomOf="@+id/button1" />

    <Button
        android:id="@+id/button3"
        android:layout_width="wrap_content"
        android:layout_height="wrap_content"
        android:layout_marginStart="32dp"
        android:layout_marginTop="80dp"
        android:text="Button3"
        app:layout_constraintStart_toStartOf="parent"
        app:layout_constraintTop_toBottomOf="@+id/button2" />

    <Button
        android:id="@+id/button4"
        android:layout_width="wrap_content"
        android:layout_height="wrap_content"
        android:layout_marginStart="32dp"
        android:layout_marginTop="80dp"
        android:text="Button4"
        app:layout_constraintStart_toStartOf="parent"
        app:layout_constraintTop_toBottomOf="@+id/button3" />

    <Button
        android:id="@+id/button5"
        android:layout_width="wrap_content"
        android:layout_height="wrap_content"
        android:layout_marginStart="32dp"
        android:layout_marginTop="80dp"
        android:text="Button5"
        app:layout_constraintStart_toStartOf="parent"
        app:layout_constraintTop_toBottomOf="@+id/button4" />

</androidx.constraintlayout.widget.ConstraintLayout>
</ScrollView>8.修正後の動作画面動画
修正後の画面の動作を以下の動画に示します。画面全体のスクロールとTextView単独のスクロールが可能です。